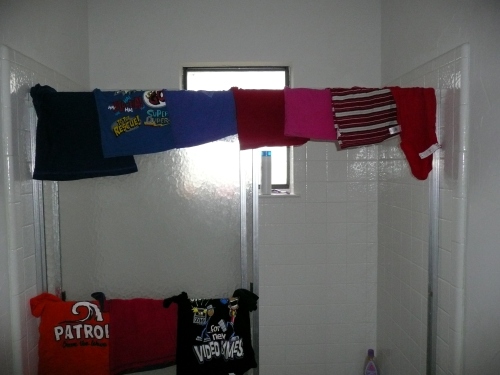
Remember when I begged for clothesline advice? I was lamenting the lack of dryer hook-up at the little brick house and trying to convince myself that there is something sweet and natural about line-dried clothes… and really there is. I do like using a clothesline; I just like it LESS as the days get wetter and colder.
Here’s what happens when you have several wet days in a row and really need to do laundry:
They end up on the bed, over the shower, and in the garage. The only thing missing was socks draped over an old radiator.
There were some other issues with the clothesline – like the fact that it was old and rusty. There’s just not much to be done about rust on your church clothes. So Danny bought me a new clothesline. This one is braided polyester cord and it works splendidly. No rust.
Here you can see the oxidizing metal one contrasted with the nice white rope one:
The only drawback with the rope is that, unlike the old steel one, it tends to stretch and sag. But I’ll take that over rust any day.
I still plan to write an exhaustive “how to maximize your clothesline” post. Be watching for it. Oh and feel free to leave clothesline advice in the comments!
What kind of clothesline would you prefer? What would you do with wet laundry on those rainy days?
Yes, I know the title is a stretch for a pun, but you have to imagine it with a high society British accent and it gets closer.
After I removed the old faucet and the sink was installed the next day, it was time for the new faucet.
We decided to go with this AquaSource faucet in polished chrome:
One requirement was that it was fairly inexpensive since we didn’t want to spend a whole lot on it. Even bigger than that, though, was that it had enough room between the water stream and the back of the sink. You know those faucets that don’t stick out very far and are so close that you can’t hardly wash your hands without rubbing all over the back of the sink? Yeah, not a fan. So we wanted to make sure to avoid that. Yes, we measured the existing ones and then measured the displays at Lowe’s to make sure it stuck farther out.
The faucet installation was pretty easy. The parts included were the faucet itself and the plastic nuts that go under the sink to hold it in place:
I had to get some piping and other parts to complete the installation:
There are different options for the water supply piping, but I chose to go with the plastic tubing rather than the braided stainless steel mainly because of cost.
After attaching the faucet to the sink and making sure it was straight, I attached the piping to the faucet with some more plastic nuts (sold separately). You can see the white nuts in this pic:
Since it was a little long, I trimmed it off rather than try to wrestle it into position.
The connection to the supply valves used another compression fitting like I talked about when installing the valves. And all done:
So now we had a working faucet once again. Only problem was we didn’t have a working drain. That installation was a little more complicated since the drain in the sink was farther out from the wall than the last one. Somehow I didn’t get any pictures, but to fix the problem I had to add a coupling and some more pipe to bring the drain farther out.
So here’s our shiny new faucet installed:
We actually left the protective plastic on the sink since we still had to texture and paint the walls, but finally got that done and the sink cleaned off. More pictures on that later.
Do you have a pet peeve (like the faucet being too close to the back) about bathroom sinks?
That’s the sound that started when we had our counter replaced in the master bathroom. We had it done at the same time as the shower was installed and they were supposed to give us a couple of days notice. Since they didn’t call until that morning and didn’t tell us to have the existing faucet and drain unhooked, everything was still connected. The installers typically don’t mess with plumbing, but decided to try it to save a trip. As he started to turn off the valve to the sink, it started dripping. It can happen with old valves. The packing (a material to help prevent leaks) and gaskets inside get old and stuck in position. Everything’s fine until you turn the valve and it all breaks loose. So they didn’t get the sink done then.
I was kind of torn on what to do. The plumbing in our house is all copper pipe as most older houses are and I had never sweated copper together before. I was a bit hesitant to try, but decided why not, that’s what this is all about. So, I did a little research on how to sweat pipes and then came across something else. A compression fitting valve. It has a thin piece which gets wedged between the valve body and the pipe to hold it in place without sweating. Not a professional installation, but it would be quicker and work for me. I stopped at Lowe’s (once again) to pick up some new valves and other parts.
Of course, the valves are always at the back of the cabinet in the hardest to reach places:
First step was to go turn off the water to the whole house:
Sometimes this can be done with a valve right outside the house. Our house has one of those, but it seems frozen and I was advised by the plumber who redid our shower valves not to force it since it’s old and it might leak. So I had to go out to the valve where it comes off the main water line.
Since the old sink was coming out anyway, I decided to take it off to work on the valves to have more room. First, I had to unhook everything from it. If the valves look hard to get too, the piping going to the sink itself is even worse:
Fortunately, removing the piping doesn’t require special tools, just some finagling with a wrench. Although, I did see a tool at Home Depot that looked like it would make things quicker. The drain is even easier:
It just has a plastic nut that unscrews from the pipe and then everything could be lifted out.
I say that as if just lifting it out was very easy. It wasn’t. I didn’t realize how much those sinks actually weigh. They’re not screwed down, because they don’t have to be. They’re not going anywhere. This one was 4’ long and weighed 108 pounds. That’s almost like trying to carry Vanessa except a little harder since the sink wouldn’t wrap its arms around me and help out. The hard part is that I couldn’t just tilt it out the front since there was a notch cut in it to go around the door trim. I had to tilt it up on its side a little to get it past that. But I got it out:
Now the fun part which requires this:
Time to take the valves off. I decided to just remove them instead of cutting the pipe and making it shorter in case I needed the length some other time. To do that, I had to heat the pipes up hot enough to melt the solder. It’s not really that difficult, just turn on the gas and use the striker to light the torch:
Then turn it down until the flame is all blue to get the most intense flame:
Finally, heat up the valve until the solder melts and it becomes loose enough to pull off:
You’ll get a little steam and some smoke as it burns off old dust and such so it would probably be best to use a mask. Also, a wet rag placed on pipes or cabinets or other wood will help protect them. Here’s a better picture showing the flame:
Sweating the valves on uses a similar heating process, but parts of the valve may be removed to avoid having the heat destroy them.
After I removed the valves, I heated the solder some more and quickly wiped it with a wet rag to remove as much as I could and then I sanded it down smooth before installing the new valves:
Here’s the compression valves I was using:
Of course you want to make sure you get ones with the inputs and outputs pointing in the right direction. For sinks, this typically means they are pointing 90 degrees from each other.
Removing the big nut exposes a little copper band called the ferrule. Don’t lose it! This is the part that gets sandwiched between the pipe and the part of the valve that goes over the pipe and gets compressed when you tighten the nut and holds everything together. The nut goes on the pipe first, then the ferrule, then the valve:
I also used some plumbers tape wrapped around the threads of the valve to help seal it against leaks:
Another option is thread sealant which is messier but may provide better results.
I tightened everything up and I was done. Shiny new valves:
Then of course it was time for the test: turning the water back on. Big suggestion: make sure the valves are in the off position before you do this. If they’re not, you’ll probably have water shooting to the ceiling. Thankfully this didn’t happen to us, but I can almost imagine Vanessa’s reaction if it had. That would have been something to see. It also helps to have someone watching for you to scream at you to turn it off if something is wrong. So, Vanessa watched while I went back outside to turn the water on. Success! Mostly. No big leaks, but I did have a little drip. I just had to tighten the nut some more and all was well.
There you have it. A change-out that wasn’t planned but was made necessary by one that was. The next day, the guys were able to install the sink and continue on.
Have you ever had a big water mess from something like a valve being in the wrong position when the water was turned on?
It’s Fall, the temps are dropping, and the leaves are changing colors. At least that’s what is happening in other places besides Texas.
But at least there is some coloring going on. We’ve painted the kids’ room!
Since it had paneling on the walls and didn’t suffer the same problem of needing the drywall patched, we didn’t have to worry about retexturing the walls. We thought about it a little, but decided to save the headache and just let the walls be different from all the rest.
Of course, before we could even get started, we had to make a little room to get to the walls:
We moved the toddler bed for Baz and the pack-n-play for Jane into our room. I’d take a picture, but our room’s a general mess right now anyway, so suffice it to say, it’s kind of cramped.
Back when were cleaning up the house to move in, we had wiped down the paneled walls with TSP to degloss them and help the paint to stick a little better so we didn’t really have any other prep work to do. I trimmed out while Vanessa rolled:
My dad was down for a couple of nights so Vanessa and I were both able to work on this while he watched the kids, but it still took most of the day since we started a little late, had to get everything moved, and the trimming took a while because I had to get enough in all the little grooves, but not so much that it ran down the wall. With three doors, a big window and the inside of two closets to trim out, that a lot of trimming, but we finally got it all primed:
It did take long enough that we decided we weren’t going to do anything else and give dad a break with the kids.
Monday, I got the room all trimmed out with paint:
We decided to go with Sand Swept by Valspar in semi-gloss from Lowes:
I guess, more correctly, Vanessa decided to go with it. I pretty much let her make most of the color decisions. That’s the color we’ll be using in most of the rooms.
We ultimately decided to paint the closets a different color since Baz kept saying he wanted a red closet. So while I was at work on Tuesday, Vanessa and Baz tackled painting his closets while Jane slept:
They couldn’t quite reach the top to trim it without the ladder, so I get to finish that up. The color used there is Autumn Fire by Valspar:
Tuesday night I got the rest of the room painted:
At first, we were going to leave all the trim white, even the small corner pieces, but after painting the walls it just wasn’t working for us. The picture makes it look better than it did in person. I went back through and painted the corners:
You’ll have to ignore the slightly tilted look to those pictures. Apparently, I need to learn how to hold the camera straight. Or get out the tripod.
One other thing we noticed after painting, is the that the trim around the window doesn’t quite work either:
Here’s a closer view:
When it was all paneling and that light beigey-browny wood color, it didn’t stand out much, but after priming and painting, the white trim on the yellow wall just it big enough. The size doesn’t fit. Maybe we’ve been reading too much on houzz.com about things like correct trim sizes, but we’ll probably be changing that out to something more fitting for that large of a window. We’ll also be painting all the trim and doors in glossy white, but will probably wait until we are ready to do more of them.
For now, we just need to get the other closet painted and let everything air out a little and get the kids (including the dog) moved back in.
One last little teaser. The bathroom walls have also changed colors as well as texture. Remember the green color before we deconstructed the master bath:
Well, we’ve managed to get some texture on them (we’ll tell what we did and how later) and got one bathroom primed. So here’s a glimpse of how they’re looking now:
What finish of paint do you prefer on your walls: flat to hide imperfections, glossy for the ease of cleaning or eggshell, satin, or semi-gloss for somewhere in between?
A silicon! What can I say, I had a chemistry teacher in high school with an unusual sense of humor. But I’m not talking about the element silicon today. Instead I’m talking about silicone. That nice nasty stuff that nobody likes to mess with since it can be so messy, but is necessary for your bath.
The joints around the tile in our main bathroom looked kind of like this:
Of course a hole in the silicone in your bath is not a good thing. Water can get in there and do all sorts of bad things like rot wood or mold. So we needed to get it replaced pretty quickly.
The first thing I did was take a box knife and cut down both sides of the existing silicone:
This freed it up a little bit and allowed me to pull out most if it in a strip:
There’s always still lots of pieces left stuck to the walls and you want to get things as clean as possible so the new silicone will stick. One way to do that is to use a blade from the box knife to scrape it off:
There are also scraping tools available that will hold a razor blade in a similar position to make it easier, but I didn’t have one of those handy. An additional step is to use mineral spirits or some cleaner to get rid of all the other dirt.
After all that cutting, pulling, and scraping, I had quite the pile:
And the joints were all cleaned out and ready to go:
You can still see some stuff in those joints. That’s even older caulking that I left in there to provide a backing for the new silicone. If you try to fill a hole much wider than a quarter-inch or so and it’s deep, it gets pretty hard to make it nice and smooth without a backing of some sort.
Now, what to fill it with. There are two options people use: acrylic caulk and silicone. Acrylic is much easier to use and clean up, but that’s about the only advantage it has. Silicone requires mineral spirits to clean off, but is much better to use in a bath. The best thing to do is keep an old rag handy for wiping up mistakes. Silicone is impermeable to water while acrylic isn’t, so the water won’t get past the silicone. Silicone will also stay soft and flexible while acrylic will get hard and crack with time. Silicone is also more resistant to mildew so it’s easier to keep clean. However, you can’t paint over silicone. If it says you can, then it’s probably not 100% silicone.
So, I decided to go with 100% silicone. Fortunately, you can get it in white.
One of the trickiest parts is applying the silicone with a caulk gun:
The trick is to get the hole in the tube just the right size. I either tend to get it too big and have too much come out at once or to small and it takes forever and gives my forearms a real workout squeezing the trigger. If you get too much, then it’s hard to get it smoothed out without it squishing out everywhere to the sides. Too little, and it won’t fill the crack and it’s hard to go back over it to add more without making a mess.
After you get it in the joint, it’s time for smoothing. No tools needed for this, although there are some you can get. All you need is your finger:
It’s best to smooth it out all in one line if you can. That will keep it all the same level and smoothness. Dipping your finger in water will also help. If it takes too long to apply the silicone, then the first part can start drying on you if you’re not careful and make it hard to smooth out. Yes, it will get all over your finger, but that’s where the old rag comes in handy. Some silicone may remain, but it won’t really be noticeable and will wear off in a day or two. I did have to put my contacts in with a different finger, though.
It may take a few hours to a day to dry completely depending on the brand, but then it’s all done and looking good:
Have you ever had to reapply silicone in the bath? Did you keep it neat or make a mess?
After all the deconstruction we did on the master bath in Phase 1, Phase 2, and Phase 3, it was finally time to start reconstructing it. This post is loaded with pictures, but there’s a lot of different things that went on to get the bathroom put back together.
First, I had to get rid of the old drain that I had left when cleaning out the old tile:
Of course, this meant going back under the house. That wasn’t too bad since the pipe I needed to cut was right beside the hole that I had cut in the floor:
I cut it off the pipe above the p-trap (so I didn’t have to replace that):
then installed a coupling and some pipe to get above the floor:
I left about 5″ sticking above the floor so there would be enough no matter what type of shower we decided to put in. The extra would be cut off when the shower floor is installed:
After that, I laid down the 1″ x 12″ pieces that I had originally cut out from the floor:
and nailed it down with the nail gun:
The exhaust from the air gun stirred up a bit of dust and the camera flash reflected it nicely so it looked like it was snowing inside:
Next, I had to replace the plywood that I had taken out. The old plywood didn’t come out in one piece, so I had to cut a new one in an “L” shape. The best way to mark that out is to use a chalk line:
Here it is all cut out, including the hole for the drain pipe. Don’t want to forget that. I did have to adjust that hole a little after getting the plywood down, though:
Sometimes it can be hard to get a piece like this to fit just right, but this just dropped on in:
Okay, so maybe it was a little tight:
Well, maybe it was really tight:
I ended up have to trim a bit off to get it to fit. My original cut when I removed the old piece wasn’t completely straight so there was a little bump out in the way. After that, I screwed it down with deck screws that are rated for outside so they could handle any moisture being attracted from underneath the house since the old nails were half rusted through. I also screwed down a few spots of the plywood that I didn’t replace to keep it from squeaking. All done:
Yes, that is the same toilet paper roll I mentioned at the end of the Final Deconstruction post, but don’t worry, it is finally gone now.
Yay! No more going under the house for me!
The next thing I needed to do was install an exhaust fan. This bathroom is pretty small and there’s no window so the humidity levels will get pretty high. An exhaust fan will vent that and help to cut down on the possibilities of mold or things getting damaged from all the moisture. We decided to go with this Broan fan from Lowe’s:
We liked the fact that it wasn’t the standard big white square. It can also be found at Home Depot under the NuTone brand.
I decided to put it close to the edge of the existing sheetrock so I could install it from in the bathroom while I had the ceiling open rather than having to crawl in the insulation in the attic:
I set it up on top of the ceiling to mark the locations for the hole and for the screws that would hold it:
Since you can see the wires sticking out of this side, that means the vent is on the other side so I had to fasten the exhaust duct over there. It was a bit awkward, but was easier than trying to wire on the other side. Speaking of wire, that black wire on the right is the power wire from the switch. It was already in place for the light that was above the old shower so I didn’t have to install any of that.
Here’s the little saw I used to cut the hole. It’s handy, but kind of dull and a little bent so it still took some work:
I guessed I skipped taking anymore pictures until this one. Here’s the installed fan from below, minus the white reflector:
After all that, it was finally ready for drywall. I added some insulation back into the ceiling and a couple of areas on the wall first though:
The photographer changed for some of these next few pictures. Since I couldn’t take pictures of myself, Baz took most of these. Vanessa was at the store or something. Not bad for a 4yr old.
I originally had bought cement backer board to go up in the shower. At first, we planned on tiling it and the cement board is a better option to put on the walls rather than any type of drywall. This is in case any moisture works its way through any of the grout and mortar of the tile or even the tile itself.
Since we changed (I think we did that at least twice) and decided to go with a synthetic (which is not water permeable) for the shower, I took the cement board back to Lowe’s and got something referred to as green board (yes, it is typically green colored). More appropriately it’s called moisture resistant drywall and is just what it sounds like. It stands up to moisture better than regular drywall (although not as well as cement board) but installs just like drywall which means it’s lighter and the screws go in easier than the cement board. It’s also cheaper.
It’s typical that the ceiling goes up first:
I started out with my cordless, but had to switch to a corded drill for more power. Makes me think I need to buy a new drill. Good excuse anyway.
The pieces I needed for the side walls weren’t a full 4′ wide so I had to cut down the whole length. The best way I found is to have the sheetrock standing on its side so you can work with it:
Since I had to cut down the long side, out came the chalk line again. Then using a box knife, I cut down the line. Since the knife won’t go all the way through the sheetrock this is really more of a scoring:
And then I just bent it backwards for it to snap perfectly at the scored line and then cut through the paper on the other side:
Just like I had to do on the plywood, there’s usually some small adjustments that need to be made to get it to fit, but in goes the first wall:
One thing to keep in mind is the wall piece needs to go all the way up against the ceiling and not down on the floor. This will give some support for the ceiling for when it can’t be fastened close to the edge and it also makes the joint smaller and easier to mud.
Don’t forget to cut a hole for the shower fixtures:
The back wall was just about the right size so I didn’t need to do any cutting on the piece. Although, if you look, you can see that it left a little wider gap on the sides:
And finally, the joint compound to cover up all the joints and screws. Also, you can see the ceiling had already been textured when I took this:
One nice thing about a small shower is that it cuts down on the number of joints that need mudding since you don’t need more than one sheet per wall.
It’s finally somewhat put back together and ready for a shower, wall texture and paint. It’s about time!
Have you ever ended up writing more than you thought you would? When this post started out, I didn’t think it was going to be that wordy, but it ended up about average for us.
While we’re on topics that are only marginally related to the house, such as our recent announcement, I thought I’d share some details of the birthday party we had here for two-year-old Jane.
It might not have much to do with house remodeling, but it does have some small crafty projects, some cute ideas, and of course, adorable children for friends and family to sigh over.
I went with The Very Hungry Caterpillar for a theme, since Jane loves that book and it seemed like a simple theme to pull off. And it was. Now our party was nothing like the every-possible-detail-in-place-so-elaborate-we-have-to-rent-a-ballroom ones I saw on Pinterest, but it was cute and kid-friendly and lots of fun.
It started with a super simple invitation. I had a picture of it, but I was too tired to blur out lines upon lines of personal information, so I’ll just describe it. Pertinent info printed on light green cardstock cut out in the shape of leaf with five holes punched down the side. Easy breezy.
This great cake was made by a dear friend of ours, who actually bartered with us for it. We gave her some vintage items that came with the house in exchange for her making this adorable cake for Jane’s birthday. Everybody wins.
The caterpillar I made from tissue paper balls bought at Walmart for about a buck each. The antennae are pipe cleaners and the eyes are made from colored cardstock attached (very carefully to avoid crushing the paper) with double-sided tape.
I originally thought I would serve ALL the foods mentioned in the book, but I finally decided against ice cream, salami, cherry pie, etc. I figured we had the majority of the foods there and that was good enough for me. Not to mention, less work and less leftovers. I made the food cards by scanning the pages of the book itself and printing them on white cardstock, which I just folded in half to make it stand. Danny, dear boy, painstakingly edited the scanned images so they wouldn’t have wonky lines and shadows all over them.
I read the book to all the kids (emphasizing the part where the caterpillar “started to look for some food”) and then sent them out into the yard to hunt for the candy and treats that I had hidden that morning.
Of course, there was gift-opening and candle-blowing and lots of cuteness happening:
And to top off a wonderful morning, Danny and a close friend from church got that John Deere up and running! That tractor was one reason we bought the house WITH all equipment and furnishings. We knew the tractor was worth a pretty good bit on its own and we hoped to have a use for it at some point in the future. So our friend, who is a die-hard tinkerer, helped Danny get it going.
And then they took the kids for rides. The perfect ending to a perfect party!
What fun birthday party themes have you done? Do you have any great birthday memories?
The air vents on our ceiling (which have now been textured, stamped and painted) were green. Bright green. Apparently, when the ceilings were painted this lovely shade of green, the vents just got rolled right over. So the paint on the vents was thick and gloppy. There were also three white vents, which had been rolled in the same fashion. It was, well, not very stylish.
So armed with paint stripper and a scraper, I went to work on the green vents:
I wore goofy goggles and rubber gloves to protect myself from the chemical paint remover and scraped at least two layers of paint off the vents. The stripper would create a “paint sludge” (that’s actually what it was called on the back of the can) that easily scraped off in most places.
At first I tried wiping it off with a clean cloth (as per the directions), but that didn’t work terribly well. So my sister-in-law and I tried spraying the vents off with the high-pressure setting on the water hose and that worked quite well. A couple of the vents needed a second treatment with the paint remover, but ultimately they ended up looking like this:
Not every speck of old paint came off, but considering the difficulty of scraping between those slats and along those tiny edges, I finally decided it was good enough.
We chose a spray paint we’ve seen recommended several times – Rustoleum’s Universal Paint and Primer in One in satin white. It covered well and looks great.
I had an amazing helper for this part of the job:
Not only is Baz handy with a can of spray paint, but he’s also quite the talented photographer:
One can covered all six vents, but just barely.
Nice smooth white vents. Such an improvement over goopy green. You read all the time on home improvement sites that it’s the little things… and it is.
Then Danny got them put back on the ceiling where they belong and they look perfect. You don’t even notice them, blending in so nicely with the white ceiling, but that’s probably what you want from your air vents.
Do you notice air vents? What color are yours? What fun, interesting, or difficult spray painting projects have you tackled lately?
You have to sing the title of this post to the tune of the song “Wishing and Hoping” made popular by Dusty Springfield:
Now that I’ve got that stuck in your head, on to the post.
This is it! We’ve completed one of the biggest projects we had lined up before us. The ceiling is done. Well, it was done almost a month ago since we wanted to get it finished before we moved in.
There’s many options for what to do with a ceiling. You can leave it flat and smooth (not even close to happening here). You can spray texture on and knock it down (or not). You can roll on, trowel on, or stamp on a design. You could even go back with popcorn if you really wanted to. The possibilities are just about endless. We decided to go with a stamped on design using a large crow’s foot brush.
The best way to apply the texture to the ceiling is to roll it on first and then stamp rather than just trying to dip the brush in the joint compound and stamp it on. The texture will come out more even.
Before we even started that though, I mixed some water into the mud to thin it out and make it easier for the roller to pick up to roll it on the ceiling:
I recommend trying out a smaller mixer such as this one rather than the big mixer you can see below. It will be a bit easier on your drill and less to clean off. My cordless drill couldn’t even hardly turn the big one so I had to switch to a corded drill.
We wanted to get the mud about the consistency of pudding. This would allow it to spread easier and also dry slower because of the added water. The slower drying time helps when trying to blend the areas it has been applied to. Of course to check it, just lift the mixer and see how easy it runs off:
After I got it all mixed up, it was into the paint pan and onto the roller:
We just used a regular 3/8″ nap paint roller to get the joint compound up on the ceiling. Getting enough on the roller to begin with is kind of a chore itself. If you’ve ever started out a new paint roller, you know how hard it can be to get the paint all around it. The roller either doesn’t want to turn or keeps rolling over with the side that already has paint going down because of the weight. Imagine that being harder because the “paint” weighs more and at the same time kind of easier since it’s thicker.
Anyway, after the roller was good and coated, it was up to the ceiling just like regular paint:
Except that it doesn’t cover as well so there are a lot more trips back to the paint pan.
I thought the roller itself made an interesting pattern and sort of suggested we leave it at that and it would go faster:
Vanessa wanted to continue with the crow’s foot design, however, and of course she won out. We briefly contemplated trying to keep all the stamps in the same direction and give it more of an ordered look but decided that would up the complexity quite a bit. Vanessa was glad we changed after getting into it for a while.
To start off with, the brush needed primed. If we had just started and gone on, the first few stamps would look different from the rest once the brush got all mudded up. The easiest way to do that is to just put some mud up and stamp around a few times until the brush gets broken in. A closet works great for that. It’ll look about like this:
Another thing to remember when using two people is that the same person should do all the stamping. Different people can have different pressures, spacing, etc. that will make the texture have different looks. So, at least in the same room, one person should do all the stamping. In our case, that was Vanessa to begin with:
The stamper also needs to be a consistent amount of time behind the roller to avoid the mud drying different amounts before stamping. I would roll on about a 2′ by 4′ section or two and then she’d come in behind and stamp it. When rolling the next section, try to avoid getting the overlaps too thick. We ended up with few spots you can see where that happened.
If it’s a large area being done, the brush may need to be washed out at some point. The edges of the bristles will dry out and either change the pattern or start leaving little chunks everywhere.
We were thankful that Vanessa’s brother came over to help out and gave her a chance to get the kids (and us) fed:
See how the brush bristles are bending down a lot? That’s a sign it needs to be washed off since they are heavy with thick dried mud.
We also ran into an issue with the mud sometimes pulling off the ceiling when stamped. We thought this seemed to happen when going over some old mud, but sometimes it looked like it was one of the spots I just patched. So, we’re not sure if it was old mud that had lost its grip when wetted by the new stuff or if it was spots where the new mud I had spread was over an area that didn’t get the sanding dust cleaned off well. Either way it was annoying and required finessing with the roller and a light touch (but still heavy enough) with the texture brush.
It took a few hours, but we finally got it done and looking like this:
That was Monday. We let it dry good for a couple of days and then it was on to priming and painting on Friday.
Since we were going over exposed drywall and joint compound, we decided to prime things first using Valspar new drywall primer:
The cost of the primer was about half that of the actual paint so we thought we could save some money by being able to cut down on the coats of paint needed. We used almost the whole 5 gallon bucket to do all the ceilings.
Of course there’s lots of cutting in to do to make sure the primer gets all the way to the edge of the ceiling since most rollers can’t reach there:
And then of course all the rolling:
One good thing about planning on painting the walls later is that we didn’t have to worry about getting ceiling paint on the walls. That meant we didn’t have to be as careful and the job went a little faster, especially the cutting in.
Still, it took us about 6 hours to finally get it all primed and looking good:
I can’t remember if the recommended wait time was 2 or 4 hours, but either way, by the time we were finished priming it all, the first areas were ready to paint.
We chose to go with Olympic ceiling paint in basic white since it was cheaper and zero VOC. We didn’t want the house still smelling when we moved in:
We know that Olympic has a bit of a reputation sometimes for not covering in one coat, but we figured we’d be fine since we primed it first.
I used the same mixer for the paint that I did for the mud. A word of caution here. Be careful not to mix too vigorously. Paint is much thinner, of course, and more susceptible to getting a big air bubble in it that rushes to the top and causes this:
Instead of trying to mop that all up, I actually left it there and let it dry completely. That took a couple of days so it was still there until after we moved, but then it just scraped up pretty easy with a joint taping knife. Good thing I didn’t mix it on the carpet.
Then more cutting in and more rolling. This time I was mainly on my own since Vanessa was getting food ready and then took the kids home to bed since it was getting late. It took me about 7 hours, but finally around 11:00, I was done:
And we were done. Primed and painted the ceilings of the whole house in one day. The next day, we moved in. We were cutting it close getting the ceilings completely textured and painted, but we made it.
Saturday, with the natural light coming in through the windows, we could actually take a look and see if the job was any good. Turns out, the living room and kitchen may need a second coat. You can’t really notice the brown of the drywall showing through too much except in the natural morning light so it can wait until we move furniture later. Maybe we should have bought different paint or at least planned on 2 coats from the beginning. Oh well, we’re learning as we go.
At least it looks a whole lot better than this:
Have you ever painted your ceilings? Did you use white or add some color? What’s the biggest paint spill you’ve had?
Remember when I gleefully destroyed those dated old spindles? And in the process left three ragged holes in the ceiling of our kitchen? Danny informed me that I made the mess so I could clean it up, handed me a roll of mesh tape, a box cutter, and a mud knife and sent me up the stepstool.
With Danny coaching me from below, I began by cutting off the jagged edges of the sheetrock:
I then made a patch using self-adhesive mesh tape, running in two directions:
Then I got muddy. I used enough mud that it sagged a bit, but we were hoping it would shrink (as joint compound does) and flatten out some. It did, but even now, if you look really closely, you can see where the patch is. Actually Danny and I can see it; I’m not sure anyone else could find it. I hope. (Danny has more on mudding techniques here.)
Then I applied more mesh tape:
And more mud:
In the end, our mesh-and-mud patches worked fine. The mesh stayed in place and the mud covered the holes.
If all you see in this next picture is white, then you’re seeing the right thing. This is after the sad little holes have been patched, textured, primed and painted and hopefully you can’t tell at all. Happy ending to the story of the three spindles.
What repairs or patches have you had to do lately? Do your current projects create more projects that have to be done down the road?